The Lost Art of Braid-In Rag Rugs
Rags can be turned into rugs in several different ways. You can make an Amish Toothbrush Rag Rug, or a No-Sew Crocheted Rag Rug. Both of these types of rugs are made with strips of fabric which get looped/knotted or crocheted until you get the size you want.
Alternatively, you can braid three strips of fabric together into braids, and then turn the braid into a circular or oval braided rug. Working from the center outward, you’ll need to keep the braids tacked together by stitching them at pretty close intervals so there are no gaping holes.
There’s another technique, though, where you create a rag rug by braiding, but it doesn’t involve stitching the braids together. These are Braid-in Rag Rugs.
Erin Halvorsen, whose Youtube Channel is chock full of clear instructions, has good tips on making these rugs.
She has a four-part tutorial on her Channel where she walks you through how to make them from stretchy fabric, like old t-shirts and other jersey material.
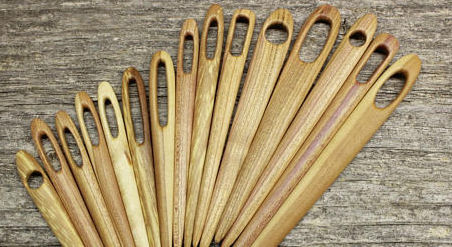
To make these rugs, you’ll need lots of fabric strips, and either a safety pin, tapestry needle, or yarn needle.
You can also make one to your own specs, using wire and tape, following instructions from Barri-Jayne.
Take note: It’s important that whatever you’re using as a ‘needle,’ in this case a blunt threading device - a closed safety pin, tapestry needle, or home-made needle – make sure it doesn’t have a sharp end. It must be round.
You’re going to be working with 4 strands of t-shirt 'yarn,' and each strand will have a ‘needle’ for working the strand into the rug in its turn, so you don’t want anything sharp slinging around while you’re braiding.
At some point while you’re working the rug, it might start to curl up at the edges. In Part 1, Erin shows a rug started with cotton sheet yarn, and you can see that it’s starting to warp and buckle because it doesn’t have enough stretchiness to make the turns at the oval ends. She switches to t-shirt fabric and has better luck with her rag rug lying flat.
In the videos below Erin is careful to explain in detail the steps to make braid-in rag rugs.
· Don't miss: Crafting Resources.
Part 1: Braiding with 4 Strands Technique
Erin shows you that the ends of the strips of jersey have to be different lengths. You will be braiding with lengths of t-shirt yarn and add to each yarn as you go along – you won’t be able to use skeins, because they would get too tangled up.
You’ll have 4 different lengths of yarns being braided together. And you’ll have to add a new strand of yarn to each braid strand as they start to run out. You'll want to stagger where the yarn strand ends are joined together.
Erin demonstrates how you take the outer strand of yarn and braid it so that it’s woven into the three other strands, and looped into the rug that’s being built up from the center out. After each braid, you tug on the strands to get them nicely interlocked.
We see Erin changing a color by adding one strand to another, using the Amish Knot method. You could also sew or machine-stitch two strands of yarn together.
Part 2: How to Start a Braid-In Rag Rug
Part 2 shows how the rug begins. Erin chooses three strands of t-shirt or jersey yarn, places them on top of each other at one end, and stitches them together. You can do this by hand or by machine. Make a three-strand braid for about a foot.
Lost Art of Braid-In Rag Rugs: Part 3
You can see that your 3-strand braid has resulted in each piece being folded over. To incorporate the 4th strand, you’ll add it at the end of your foot-long start. You’ll bend it in half, weave it into the 3 strands by going under/over, and then sew or machine stitch this 4th strand to the other strands.
Now you’re set to start the In-Braiding Method. Place your foot-long starter perpendicular to you, with the strands farthest away from you. Separate the strands a bit to form the order they’ll be braided. You’ve got your first row of braids, about a foot long. Now you’re going to make your second row, working towards yourself.
Thread each of your strands into a needle or attach safety pins to the ends.
Erin shows how to In-Braid, reiterating what she demonstrated in the 1st video. It’s a bit harder to make the first few rows, but becomes easier as you go further away from the center.
Part 4: How to Turn a Corner
In Part 4, Erin shows what needs to be done to turn the corner.
So far, Erin’s worked a 3-strand braid going one way for a foot, and then she worked it going the opposite way, incorporating the 4th strand.
Now she’s back at her starting point, and has to turn a corner in order to continue. In order to do that and keep the rug flat, she adds extra stitches, by braiding in the same holes. These extra stitches compensate for the added volume needed at the oval ends so the rug doesn’t buckle. (If you’ve made a crocheted rag rug, you’ve done this at the oval ends.)
T-shirt yarn is floppy, and you have to do a lot of tugging and pulling to get this rag rug to be even and sit flat. But if you’ve got the patience to wrestle the fabric around the first couple of turns, it’ll get easier and you’ll end up with a wonderful rug that will last for years.
How to Finish a Braid-In Rag Rug
When you’ve got your Braid-In Rag Rug at the desired size, it’s time to properly finish it off. This technique does not involve any stitching.
Erin demonstrates how to weave the strands into the rug one yarn strand at a time.
If you'd like to read more about rag rugs, check out How to Make a Rag Rug and How to Make a Toothbrush Amish Rug.
POPULAR POSTS
Follow a tutorial for making a patchworked bag with Sashiko topstitching. | Follow tutorials for how to create traditional Japanese embroidery stitching. | Explore a library's digitized vintage maps, which you can download for free. | Learn from a museum textile curator how to best care for your quilts. |
Learn to make a basket weave pattern quilt from scraps of fabric. | Sisters Lorna and Jill Watt create amazing yarn bomb installations . | Ceramic artists create fantastical structures using magnetic clay. | Learn about a Viking fabric-making technique which pre-dates knitting. |
Follow a tutorial for making a bilum bag - PNG's traditional fabric. | Learn to make a pinhole camera; develop paper film with common items. | Learn about a stretchy fabric made with connected loops. | Free digitized knitting magazines 1800 - now. |
